Mom always makes the best pumpkin pie and this one is no exception! Rich, creamy and with just the right amount of spices, this easy Pumpkin Pie, made all in one bowl, comes out perfect every time.
Best Pumpkin Pie with Flaky Pastry Crust
What would Thanksgiving be without pumpkin pie? It seems I never think of making a pumpkin pie except around Thanksgiving and Christmas but when I do make it, it is always a treat. Maybe I subconsciously plan it that way because it makes the family appreciate it so much more. lol
The recipe is from my Mom and is one of the best pumpkin pies I have ever had. She was an expert in the kitchen and loved to bake, everything and anything. Our house always smelled wonderful and, thinking back, I think that is why there were always so many kids in the house.
The filling to this pie, which I believe started out from the back of a Comstock can, was adapted and tinkered with until mom had just the right amount of spices to titillate the taste buds and have you thinking of heaven.
FAQs About Homemade Pumpkin Pie
Why does my pumpkin pie separate from the crust?
As the pie bakes, the moisture evaporates from the filling and, as it cools, it shrinks. It is perfectly natural for this to happen.
Why does my pie crack on top?
Usually a pumpkin pie cracks due to overcooking. It is very easy to do as it is hard to tell when it is done. It will still taste great and can easily be covereed with a few decorations or whipped cream. To test for doneness, either insert a knife in the center, which should come out clean when done, or jiggle the pie plate gently. The pie is done if it does not jiggle in the center.
Does this easy pumpkin pie need to be refrigerated when cool?
Yes, it does. The pie contains milk and eggs to make the custard which need to be refrigerated.
How long will this homemade pumpkin pie last in the refrigerator.
I think the pie tastes best when eaten within 3-4 days.
Making this Pumpkin Pie is as easy, well, as pie!
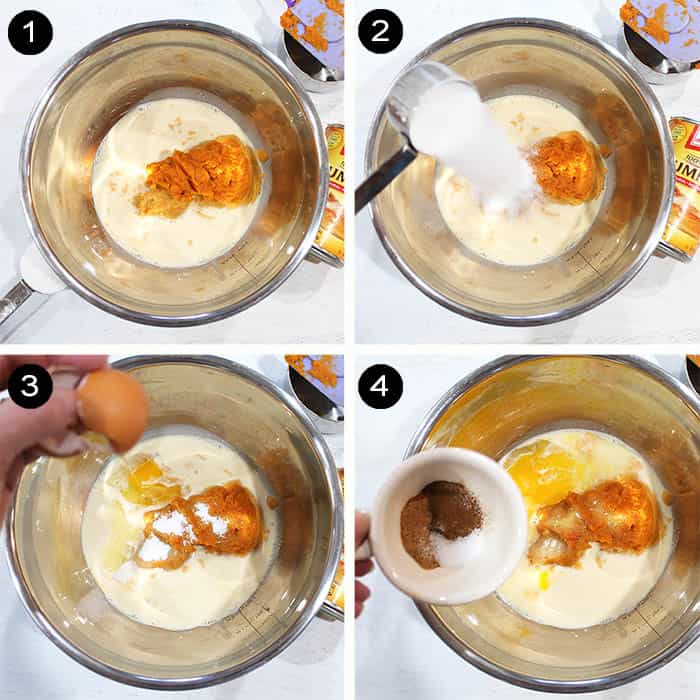
- In a large bowl, combine pumpkin puree with evaporated milk. (photo 1)
- Pour in sugar. (photo 2)
- Add eggs. (photo 3)
- Flavor with nutmeg, ginger, cinnamon and salt. (photo 4)
Making Homemade Pie Crust
I have always heard that people dread making pies because of the crust. It really isn't that hard and with a little bit of practice you can become an expert at making a crust that comes out perfect every time. I love one that is buttery and flaky just like moms always was and, all you have to do to duplicate it, is just remember these two important tips. When making the crust, always start out with very cold butter and don't overwork the dough as that can make it denser and not so flaky. Easy, right?
Don't feel like making a homemade crust? No problem! The pumpkin pie filling is good no matter what you put it in!
To make dough (not pictured) Sift flour and salt together into large bowl. Using a pastry cutter, or two knives, cut in shortening until the mixture resembles coarse crumbs. Add the water a tablespoon at a time, stirring lightly with fork, and continue until the dough holds together when pinched between your fingers.
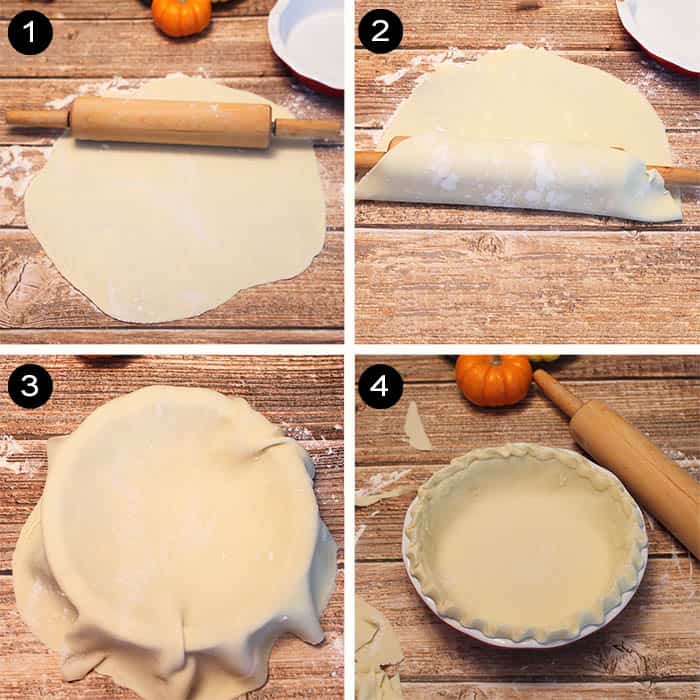
- Divide dough in half and roll into balls. Sprinkle your surface with flour, as well as the top of the dough, and roll one of the balls of dough into a circle that is slightly larger than the pie plate.
- Fold over rolling pin.
- Lift over pie plate. Let settle into pie plate, gently patting into place. Trim overhanging sides of dough to within 1-½-inches.
- Fold over to form a standing rim. Pinch dough together using your index finger and pinkie, pressing from outside-in to form a depression, skip ½" and make another depression with finger. Continue all the way around. Set aside.
To assemble pie:
Want to save this recipe?
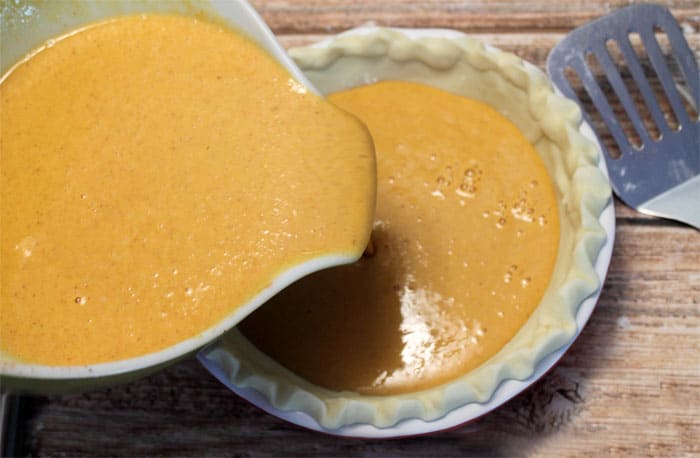
Pour pie filling into unbaked crust.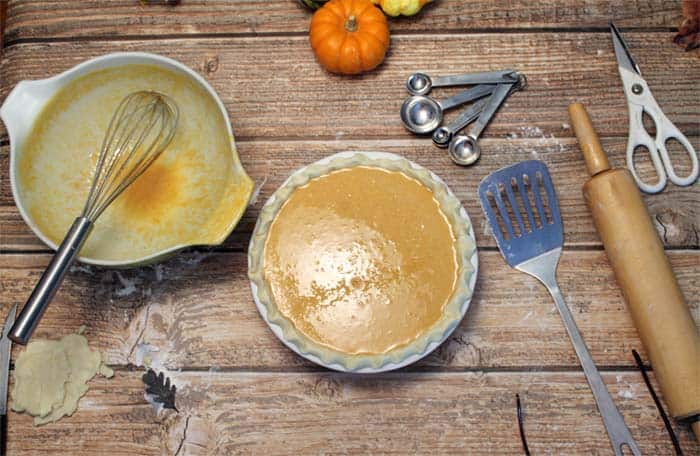
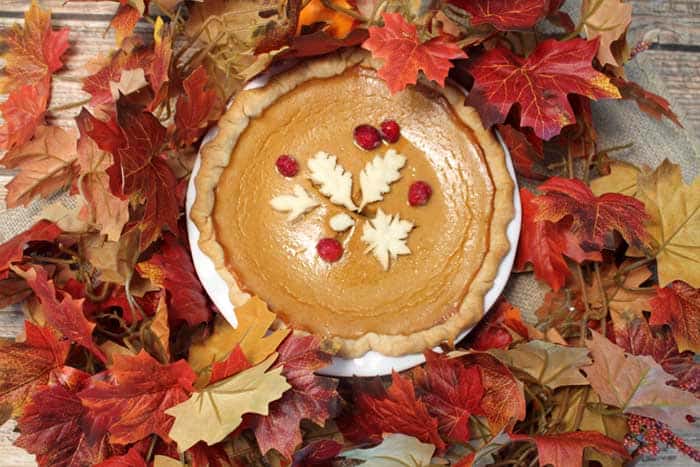
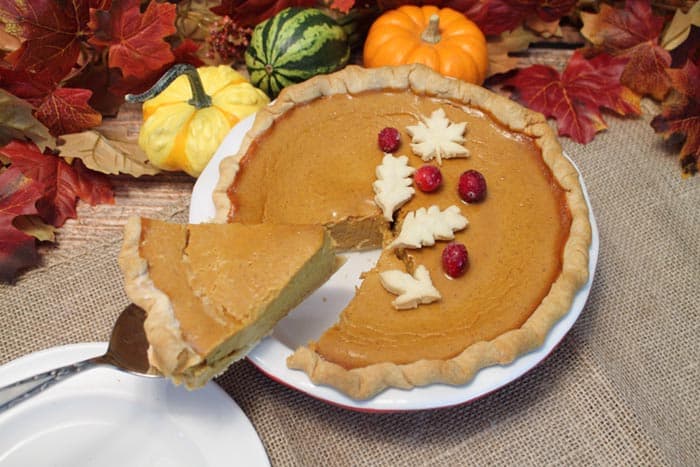
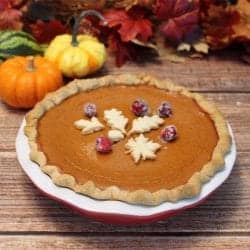
Decorate Your Homemade Pumpkin Pie for the Season
One of the newest additions I've made to mom's pie is to decorate it with leaf-shaped pie decorations made from the leftover crust. I don't like to overdo it but it does make a pretty statement before it's cut. You can also add a few cranberries with sugar coating. I freeze mine, run them under a little water, then roll in sugar. You've got to do this right before you serve it as they look prettiest when frozen.
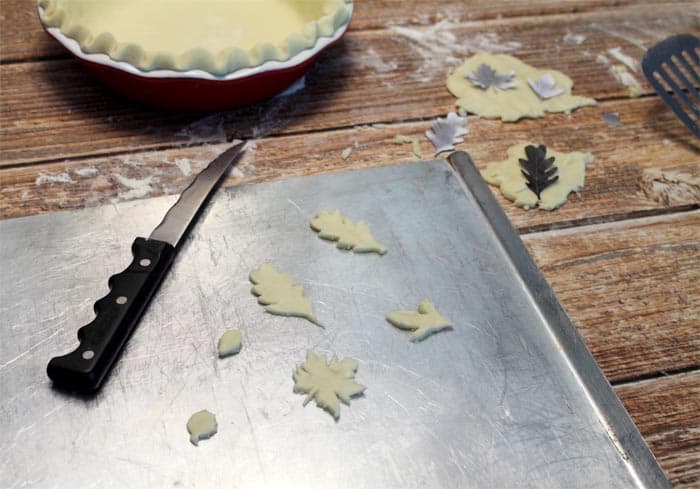
Roll out remaining ball of dough, and using a small leaf shaped cookie cutter or a leaf itself, cut shapes in dough.

Decorate the edges or center of pie prior to cooking or bake along side pie on cookie sheet and place in center of the pie after it is baked.
Gluten-free Nut Crust Option
If you're gluten-free, I've included directions of a delicious nut crust in the notes section which can be substituted for the regular crust. Or maybe you just want to change it up and make something a little different. Whichever way you make it - it's oh so good! Thanks for the great recipe Mom. Love you lots!
More Holiday Desserts to Enjoy
No Bake Pumpkin Cheesecake from 2 Cookin Mamas
Double Chocolate Pumpkin Pie from Family Spice
Easy One Bowl Apple Cake from 2 Cookin Mamas
Love quick & easy recipes? Follow me on Instagram, Facebook, Pinterest & Twitter for all the latest recipe inspiration! Plus join my email list here and receive a free e-book.
EASY PUMPKIN PIE
Ingredients
Pastry Crust (see notes for gluten-free crust)
- 2 cups flour, sifted
- 1 teaspoon salt
- ⅔ cup shortening
- 5-6 Tablespoons ice water
Pie Filling
- 15 oz. can real pumpkin
- 14 oz. can evaporated milk
- 2 eggs
- ½ cup sugar
- 1 teaspoon nutmeg
- 1 teaspoon ginger
- 1 teaspoon cinnamon
- ½ teaspoon salt
Instructions
- Preheat oven to 375 degrees.
Pastry Crust
- Sift flour and salt together into large bowl.
- Using a pastry cutter, or two knives, cut in shortening until the mixture resembles coarse crumbs. Add the water a tablespoon at a time, stirring lightly with fork, and continue until the dough holds together when pinched between your fingers.
- Divide dough in half and roll into balls.
- Sprinkle your surface with flour, as well as the top of the dough, and roll one of the balls of dough into a circle that is slightly larger than the pie plate.
- Fold over rolling pin and lift over pie plate. Let settle into pie plate, gently patting into place. Trim overhanging sides of dough to within 1-½-inches and fold over to form a standing rim, pinching dough together.
- Using your index or pinkie finger, press from outside-in to form a depression, skip ½" and make another depression with finger. Continue all the way around. Set aside.
- Roll out remaining ball of dough, and using a small leaf shaped cookie cutter, cut shapes in dough. These will be used to decorate the edges or center of pie prior to cooking or the center of the pie after it is baked.
Note: If you would rather leave the pie shell with no decoration, cut the ingredients for dough in half.
Pie Filling
- Mix all ingredients together until smooth. Pour into prepared pie crust.
- Place in oven and bake 50-65 minutes or until knife inserted in center comes out clean. Remove and place on cooling rack.
- When cooled, place decorative dough leaves in center of pie and store pie in refrigerator for at least an hour prior to serving.
Notes
Gluten-Free Nut Crust
Ingredients
- 2-½ cups pecans, ground
- ¼ teaspoon cinnamon
- ⅓ cup sugar
- 4 Tablespoons butter, melted
Directions
- In a medium bowl, mix together pecans, cinnamon and sugar.
- Melt butter and add to pecan mixture.
- Once all has been incorporated, pour into pie/tart dish and press into sides and bottom.
- Refrigerate for at least 30 minutes then fill with pie filling.
- Place on cookie sheet in preheated oven.
- Bake 50-65 minutes or until knife in center comes out clean. Watch carefully as nut crusts tend to brown faster than pastry crusts. After 15-20 minutes, check to see if it is getting too brown. If so, tent pie with aluminum foil for the remainder of cooking time. If not, continue to check every 5 minutes until it is time to tent.
- Remove and place on cooling rack.
- When cooled, place decorative dough leaves in center of pie and store pie in refrigerator for at least an hour prior to serving.
Want to save this recipe?
Nutrition
This post was first published on November 12, 2013 and has been updated with more information and easy step-by-step instructions.
Leave a Reply